Different embroidery stitches create different textures, levels of coverage, and visual effects. Running stitch is ideal for outlines and fine details, tatami stitch works well for filling larger areas, and satin stitch creates smooth, lustrous lettering and borders. Understanding these three common embroidery stitches helps brands choose the right technique for custom patches, clothing, hats, and bags.
Why Does Embroidery Stitch Selection Matter?
Embroidery is widely used to decorate apparel, bags, hats, uniforms, and custom patches. However, the quality and appearance of an embroidered logo depend on more than thread color and artwork.
The embroidery stitch determines how the thread covers the fabric, how the design feels to the touch, and how clearly different details are reproduced.
For example, a logo with fine outlines and small lettering may require a different stitch combination from a design featuring a large filled background. Using the wrong stitch can make a design look too heavy, leave unwanted gaps, or reduce the clarity of small details.
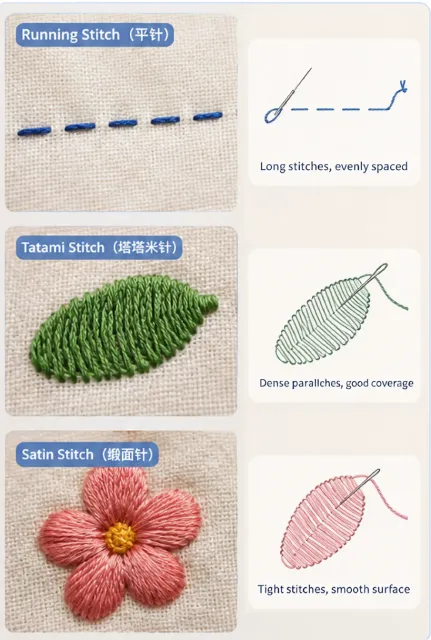
Three commonly used embroidery stitches are:
- Running stitch: Creates thin lines and outlines using a sequence of individual stitches.
- Tatami stitch: Uses rows of fill stitches to cover larger areas.
- Satin stitch: Places closely spaced stitches across a narrow shape to create a smooth, lustrous surface.
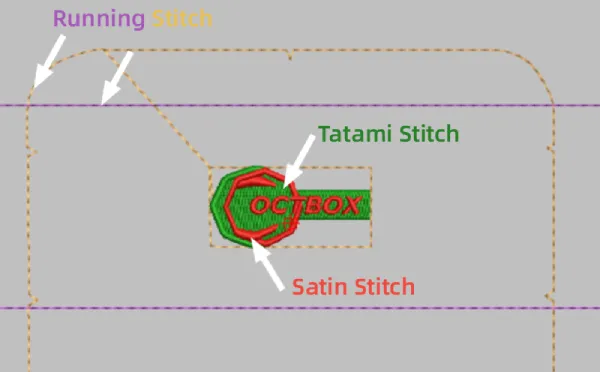
Each stitch has its own strengths. In commercial embroidery, they are often combined within the same design to achieve the desired result.
1. Running Stitch: Best for Fine Lines and Outlines
<AsyncImage query=”embroidery running stitch close up dashed line outline embroidery thread on fabric” aspectRatio=”16:9″ width=”100%” />
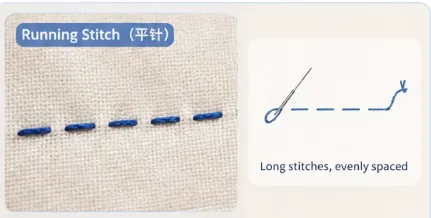
Running stitch is one of the simplest embroidery stitches. The needle moves in and out of the fabric along a defined path, creating a continuous line made up of individual stitches.
Depending on the stitch length and thread, the result can resemble a fine dotted line or a clean, continuous outline.
Key Characteristics of Running Stitch
- Lightweight appearance: Uses relatively little thread compared with dense fill stitches.
- Fine line definition: Works well for outlines, narrow details, and delicate decorative elements.
- Flexible design application: Can follow straight lines, curves, and more complex paths.
- Limited coverage: Does not provide the same solid fill as tatami or satin stitching.
When Should You Use Running Stitch?
Running stitch is useful when the design requires line work rather than a large area of thread coverage.
一般的な用途は以下の通り:
- Fine outlines around embroidered logos
- Decorative lines on clothing and accessories
- Lightweight lettering and simple graphic details
- Stitching details on hats and bags
- Internal lines that separate different parts of a design
For custom embroidered patches, running stitch can define a border or add fine details inside a larger embroidered shape.
However, extremely small lettering or very thin lines may not reproduce reliably. The final result depends on the artwork size, thread thickness, stitch length, and fabric stability.
Manufacturing tip: Do not assume that every fine line in a digital logo can be embroidered at its original width. Some details may need to be simplified or slightly enlarged to remain clear in production.
2. Tatami Stitch: Best for Filling Larger Areas
<AsyncImage query=”tatami fill stitch machine embroidery close up dense parallel rows thread filled logo on twill fabric” aspectRatio=”16:9″ width=”100%” />
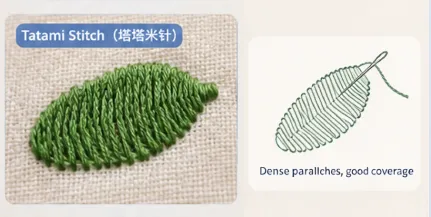
Tatami stitch, also known as a fill stitch, is commonly used to cover relatively large areas with closely arranged rows of embroidery stitches.
The stitch pattern resembles the woven surface of a traditional tatami mat, which is where the name comes from. By adjusting the stitch spacing, direction, and row arrangement, embroiderers can create a relatively uniform filled surface.
Key Characteristics of Tatami Stitch
- Broad coverage: Suitable for filling large shapes and background areas.
- Consistent texture: Creates a recognizable stitched surface across the filled region.
- Flexible stitch direction: Different directions can help produce visual contrast and follow the design.
- Higher thread usage: Large filled areas can require substantial thread and machine time.
When Should You Use Tatami Stitch?
Tatami stitch is often suitable for designs with larger solid shapes or broad areas that need to be filled with thread.
代表的な用途は以下の通り:
- Large logo backgrounds
- Filled shapes in embroidered patches
- Sportswear and outdoor apparel branding
- Decorative graphics on bags and uniforms
- Larger symbols and artwork elements
For custom embroidered patches, tatami stitch can create a substantial embroidered appearance and help cover the base fabric where a filled surface is required.
However, using too much fill stitching can make a patch stiff or heavy. Excessive density may also cause puckering or distortion, depending on the fabric, backing, design, and machine settings.
Manufacturing tip: The goal is not to use the highest possible stitch density. The goal is to achieve sufficient coverage while maintaining the intended texture, flexibility, and shape.
3. Satin Stitch: Best for Smooth Lettering and Defined Edges
<AsyncImage query=”satin stitch embroidery close up glossy smooth raised embroidered lettering on fabric” aspectRatio=”16:9″ width=”100%” />
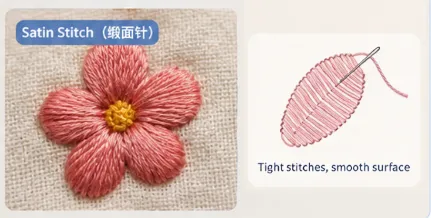
Satin stitch uses closely spaced stitches that span across a relatively narrow shape. When arranged correctly, the thread lies in a smooth, continuous-looking surface that reflects light and creates a subtle sheen.
Unlike tatami stitch, which fills an area through multiple rows of fill stitching, satin stitch typically spans from one edge of a narrow shape to the other.
Key Characteristics of Satin Stitch
- Smooth surface: Creates a polished appearance with a visible thread sheen.
- Defined edges: Suitable for lettering, borders, and narrow shapes.
- Dimensional effect: Can appear slightly raised because of the thread coverage.
- Width limitations: Very wide areas may be unsuitable for a single satin column and may require another stitch construction.
When Should You Use Satin Stitch?
Satin stitch is particularly effective when a design needs clear edges and a refined embroidered finish.
一般的な用途は以下の通り:
- Brand names and lettering
- Narrow logo elements
- Borders around embroidered patches
- Decorative lines and symbols
- Small floral details and selected shapes
In apparel branding, satin stitch can make text and logo outlines stand out against the background fabric. Its smooth surface can also create a contrast with the more textured appearance of tatami stitching.
However, satin stitch is not the best choice for every shape. If an area is too wide, the stitches may become less stable or fail to produce the desired result. The embroidery digitizer may need to divide the area, change the stitch direction, or use tatami fill instead.
Manufacturing tip: Satin stitch is often a strong choice for narrow lettering and borders, but the appropriate stitch width depends on the thread, material, design, and production conditions.
Running Stitch vs. Tatami Stitch vs. Satin Stitch
The following comparison summarizes the main differences between the three embroidery stitches.
| 特徴 | ランニングステッチ | Tatami Stitch | サテンステッチ |
|---|---|---|---|
| Main purpose | Lines and outlines | Filling larger areas | Narrow shapes, lettering, and borders |
| Visual appearance | Fine, linear | Textured, filled | Smooth and lustrous |
| Thread coverage | Low | 幅広い | Dense across a narrow shape |
| Typical texture | Light and subtle | More visibly stitched | Smooth and slightly raised |
| 最適な用途 | Fine details and contours | Backgrounds and solid shapes | Text, borders, and defined edges |
| Main limitation | Limited solid coverage | Can become heavy if overfilled | Not ideal for every wide shape |
The important distinction is that these stitches serve different functions. Running stitch defines lines, tatami stitch covers larger areas, and satin stitch creates a smooth surface across narrower shapes.
Choosing the right stitch depends on the design’s structure, not simply on which stitch looks most attractive in isolation.
Can Different Embroidery Stitches Be Combined in One Logo?
Yes. In fact, combining different stitches is often the most effective way to reproduce a complex embroidered logo.
A single design may contain thin outlines, large filled shapes, and narrow lettering. Trying to produce all three using the same stitch could compromise the final appearance.
For example, a custom embroidered patch might use:
- Running stitch for fine internal outlines
- Tatami stitch for a large colored background or filled symbol
- Satin stitch for the logo name and outer border
This combination allows each element to use the stitch best suited to its shape and visual purpose.
The embroidery digitizer must also consider stitch direction, thread tension, overlap, underlay, and the order in which the different sections are embroidered. These factors influence how the design looks and how stable it remains during production.
A good stitch plan balances appearance with practical manufacturing requirements.
How Stitch Selection Affects Embroidery Patch Pricing
Embroidery stitch selection can also affect the cost of a custom patch.
Although running stitch often uses less thread than dense fill stitching, the final price depends on more than the stitch name.
Important cost factors include:
- Total stitch count: More stitches generally mean more machine time.
- Embroidery density: Dense coverage can increase thread usage and production time.
- Design complexity: Frequent direction changes and small details may require more digitizing work.
- パッチのサイズ: Larger designs may require more stitches and materials.
- Base fabric and backing: Different materials can affect production settings and finishing requirements.
- Production quantity: Setup costs and machine efficiency vary with order size.
For example, a logo with a large tatami-filled background may require significantly more stitches than a design using only running stitch outlines. A satin-stitched wordmark may use fewer stitches than a heavily filled design of the same overall dimensions, depending on the artwork.
This is why two embroidered patches with similar dimensions can have different prices.
When requesting a quotation, buyers should communicate the desired appearance and provide clear artwork. The manufacturer can then recommend an appropriate stitch plan that balances visual quality, durability, and cost.
How to Choose the Right Embroidery Stitch for Your Product
Before production begins, consider the following questions.
What Is the Main Visual Purpose?
If the design emphasizes fine outlines, running stitch may be appropriate. If it requires large areas of thread coverage, tatami stitch is often a better option. If the priority is smooth lettering or a defined border, satin stitch may be more suitable.
How Small Are the Details?
Fine lines and small text need to be evaluated at the actual finished size. Details that look clear on a computer screen may become difficult to embroider accurately when reduced.
How Much Texture Do You Want?
Tatami stitch creates a visibly stitched fill, while satin stitch produces a smoother surface. Running stitch creates a lighter, more linear effect.
The choice should match the intended brand identity and the material on which the patch will be used.
Does the Product Need to Remain Flexible?
Heavy embroidery can increase stiffness. For lightweight garments or flexible accessories, stitch density and coverage should be balanced against the required hand feel.
What Is the Production Budget?
If cost is a concern, discuss possible adjustments with the manufacturer. Simplifying unnecessary filled areas or revising tiny details may reduce stitch count without compromising the most important features of the design.
A sample is often the best way to confirm whether the proposed stitch combination achieves the desired result.
Frequently Asked Questions About Embroidery Stitches
What is the difference between running stitch and satin stitch?
Running stitch creates a line from individual stitches along a path. Satin stitch places closely spaced stitches across a narrow shape, producing a smoother, fuller surface. Running stitch is generally used for outlines and fine details, while satin stitch is common for lettering and borders.
What is tatami stitch used for in embroidery?
Tatami stitch is mainly used to fill larger areas with rows of embroidery stitches. It is common in embroidered logos, patches, symbols, and background shapes that require broader thread coverage.
Which embroidery stitch is best for lettering?
Satin stitch is often suitable for narrow lettering because it creates smooth surfaces and defined edges. Very small text may require design adjustments, and the best stitch depends on the letter size, font, thread, and material.
Which embroidery stitch uses the least thread?
Running stitch generally uses less thread than dense fill stitching when comparing similar line-based designs. However, actual thread consumption depends on stitch length, design size, density, and construction.
Can all three embroidery stitches be used on one patch?
Yes. Running stitch can define outlines, tatami stitch can fill larger shapes, and satin stitch can highlight lettering and borders. Combining them often produces a more balanced and detailed result.
Does higher stitch density always mean better embroidery quality?
No. Excessive density can make the patch stiff, increase production costs, and contribute to puckering or distortion. The right density is the one that delivers the required coverage and appearance while maintaining suitable construction and stability.
Final Thoughts: Choose the Stitch That Fits the Design
Running stitch, tatami stitch, and satin stitch each serve a different purpose in embroidery.
Running stitch creates clean lines and outlines. Tatami stitch fills larger areas with thread. Satin stitch produces smooth lettering, narrow shapes, and defined borders.
For custom embroidered patches, apparel labels, hats, and bags, the best result often comes from combining these techniques rather than relying on a single stitch throughout the design.
When developing an embroidered logo, consider the finished size, required texture, fabric, flexibility, and budget. A well-planned stitch combination can improve visual clarity, control production costs, and help the finished product reflect the brand’s intended quality.
著者について
——————————————————————————————————————————————

エイミー
セールス・マネージャー
セールスマネージャーのエイミーです。ディテール重視のフレンドリーなアプローチで、お客様のニーズに丁寧に耳を傾け、きめ細やかなサービスを提供し、お客様が安心して最高のソリューションを見つけられるよう心がけています。
——————————————————————————————————————————————