Se você deseja personalizar suas roupas, acessórios ou projetos de artesanato, remendos para passar a ferro são uma maneira simples e estilosa de adicionar seu próprio toque. Seja para personalizar uma jaqueta jeans, consertar uma mochila desgastada ou simplesmente mostrar sua personalidade, aprender como fazer remendos de ferro em casa é uma solução criativa e econômica.
Neste guia, iremos percorrer o processo passo a passo para fazer seus próprios patches, materiais que você precisará, dicas de design e as diferenças entre Patches de ferro faça você mesmo e aqueles feitos profissionalmente.

Por que fazer seus próprios adesivos termocolantes?
Há muitos patches prontos disponíveis em lojas e online, mas criar os seus próprios oferece várias vantagens:
- Liberdade Criativa:Você escolhe as cores, padrões, formas e mensagens.
- Economia de custos:Faça você mesmo, muitas vezes, é mais barato do que comprar designs personalizados.
- Singularidade:Seu patch será único.
- Sustainability: Use sobras de tecido ou reaproveite roupas velhas.
Quer você esteja criando um patch divertido para a camisa de uma criança ou queira um design personalizado para seu clube ou evento, Patches de ferro faça você mesmo lhe dá controle total sobre a aparência.
Materiais que você precisará
Para fazer adesivos termocolantes em casa, reúna os seguintes materiais:
- Tecido (algodão ou sarja funcionam melhor)
- Tecido fusível/Heat n Bond (esta é a camada adesiva)
- Ferro ou prensa térmica
- Scissors
- Linha de bordar ou tinta para tecido (opcional, para elementos decorativos)
- Papel vegetal ou papel de transferência para impressão (para seus projetos)
Você também pode usar feltro, jeans ou lona, dependendo da textura e durabilidade que deseja.

Guia passo a passo para fazer remendos termocolantes
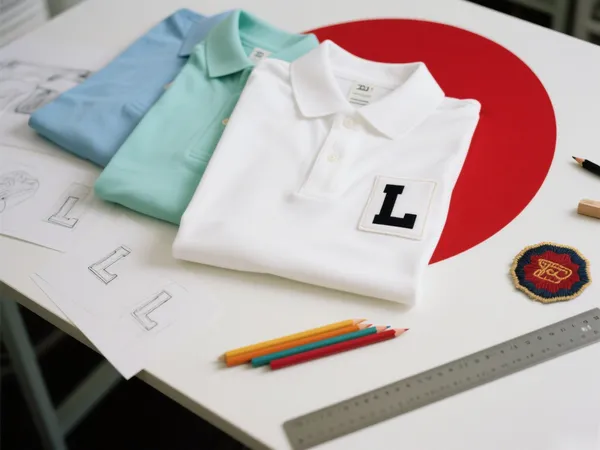
1. Escolha seu design
Comece com um esboço simples, um logotipo ou um símbolo que você goste. Se você é novo nisso, formas geométricas ou iniciais são ótimas para praticar.
Você pode desenhar seu design à mão, traçá-lo ou imprimi-lo usando papel de transferência.
2. Corte o tecido
Corte o tecido escolhido um pouco maior que o desenho. Deixe uma borda se planeja costurar as bordas depois.
3. Decore seu patch
Se você quiser um visual gráfico, use tinta para tecido ou marcadores permanentes para desenhar seu desenho. Para mais textura e durabilidade, borde seu desenho com linha de bordar.
É aqui que a criatividade brilha: sinta-se à vontade para sobrepor tecidos ou adicionar lantejoulas, miçangas ou até mesmo glitter, dependendo do estilo que você deseja.
4. Anexar teia fusível
Corte um pedaço de fita termocolante (como Heat n Bond) do tamanho do seu remendo. Siga as instruções do produto e use o ferro de passar para fixar o adesivo ao remendo. lado de trás do patch.
Certifique-se de que o lado adesivo esteja voltado para a parte de trás do remendo e não para o ferro!
5. Aparar e finalizar bordas
Depois que o design estiver concluído e o adesivo aplicado, corte o remendo no formato final. Se quiser um visual mais clean ou maior durabilidade, costure as bordas com ponto zigue-zague.
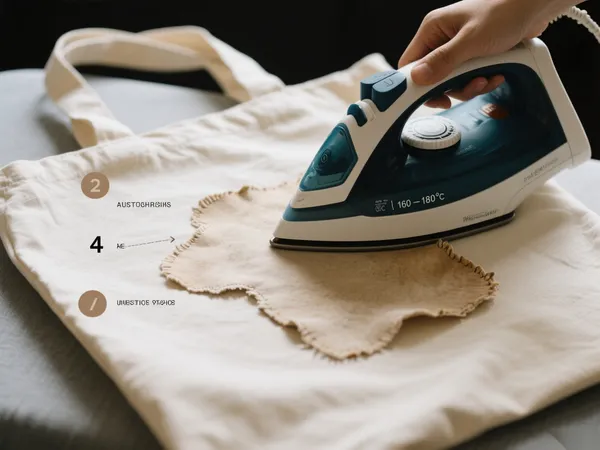
6. Passe o ferro no seu item
Para fixar o remendo finalizado, retire o papel protetor da fita termocolante e coloque o remendo onde você quiser na roupa. Cubra com um pano e pressione com um ferro quente (sem vapor) por 30 a 45 segundos.
Deixe esfriar e verifique se aderiu completamente. Se alguma ponta se soltar, repita o processo.
Dicas para o Sucesso
- Use tecidos de trama justa como sarja de algodão para a base para garantir durabilidade.
- Não pule o adesivo camada — é o que faz seu adesivo grudar!
- Se o seu remendo for detalhado ou grande, considere reforçá-lo com alguns pontos depois de passado a ferro.
- Sempre teste em um retalho de tecido antes de aplicá-lo na peça final.
Quando considerar patches personalizados profissionais
Ao fazer Patches de ferro faça você mesmo é divertido e gratificante, às vezes você pode precisar de um acabamento mais durável ou profissional — especialmente para itens que serão lavados com frequência ou usados em condições difíceis. É aí que remendos de tecido personalizados feitos por fabricantes de patches.
Os patches feitos profissionalmente geralmente apresentam:
- Bordado de alta qualidade ou detalhes tecidos
- Bordas de corte limpas usando máquinas de corte a laser ou a quente
- Suportes fortes ativados por calor para adesão duradoura
- Consistência em grandes lotes
Se você cria uniformes, administra uma marca de roupas ou produz produtos para eventos, trabalhar com uma fábrica de patches pode economizar tempo e, ao mesmo tempo, manter uma aparência e um toque premium.
Considerações finais
Aprendizado como fazer remendos de ferro dá a você o poder de personalizar seu guarda-roupa, expressar sua criatividade e prolongar a vida útil de suas peças favoritas. Seja para criar algo fofo e divertido ou ousado e estiloso, os patches DIY podem ser tão simples ou detalhados quanto você quiser.
Com apenas alguns materiais e um pouco de imaginação, você pode transformar roupas velhas em algo novo, fazer presentes artesanais atenciosos ou até mesmo começar sua própria coleção de remendos personalizados.
Então pegue seu ferro e algum tecido — sua próxima obra-prima está a apenas um remendo de distância.