Iron-on patches are a fantastic way to customize your clothing, hats, and other fabric items, but what happens when you want to remove them? Whether you’ve grown tired of a design, need to replace a patch, or simply want to refresh your look, knowing how to remove iron on patches properly is essential. In this blog post, we will guide you through the best techniques for removing iron-on patches, ensuring you can do so without damaging your clothing or fabric.

Why Would You Need to Remove Iron-On Patches?
Before diving into the removal process, let’s first discuss why you might want to remove iron-on patches in the first place:
- Outdated Designs
Sometimes, a patch might no longer reflect your style, or maybe it’s no longer relevant. If it’s a logo or a design that’s out of date, removing it can help refresh the garment and give it a more modern look. - Replacing Patches
You may have a situation where you want to change a damaged or faded patch for a new one. This is common with uniforms, team apparel, or personalized clothing where patches are frequently applied. - Mistakes in Placement
While iron-on patches are easy to apply, sometimes they don’t land exactly where you want them. If you’ve made an error in placement, knowing how to take off iron-on patches is key to correcting the mistake.
How to Remove Iron-On Patches: The Best Methods
Now that we’ve established why you might need to remove a patch, let’s look at the step-by-step methods you can use to safely remove your iron-on patches.
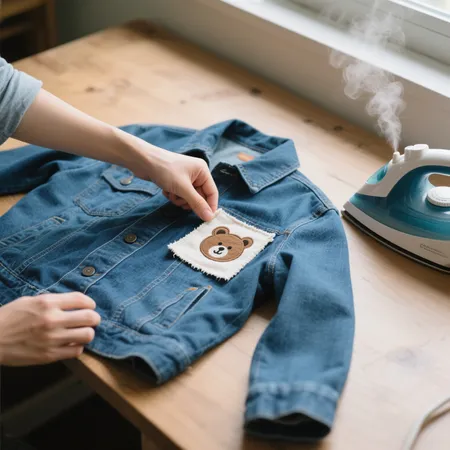
1. Use Heat to Loosen the Adhesive
The adhesive backing of iron-on patches relies on heat to bond to fabric. To remove a patch, you need to reverse the process by applying heat again. Here’s how to do it:
- Step 1: Gather Your Materials
You’ll need a few tools to get started:- Iron (preferably a steam iron)
- A piece of cloth or parchment paper
- Tweezers or a flat tool (optional)
- Step 2: Heat Up the Iron
Set your iron to a low heat setting, and make sure the steam function is off. You don’t need a high temperature—just enough to loosen the adhesive without damaging the fabric. - Step 3: Cover the Patch
Place a thin piece of cloth or parchment paper over the patch. This will protect both the patch and the fabric from direct heat and prevent any burns. - Step 4: Apply Heat
Press the iron down gently on top of the patch for about 30 seconds to 1 minute. The heat should begin to loosen the adhesive backing of the patch. - Step 5: Peel the Patch
Once the patch has warmed up, use tweezers or a flat tool to gently lift the patch. If the patch doesn’t peel off easily, reapply the heat for a little longer.
2. Use a Hair Dryer
If you don’t have an iron handy, a hair dryer can also do the trick. It’s not as powerful as an iron, but it can still loosen the adhesive enough to remove the patch.
- Step 1: Set the Hair Dryer to High Heat
Turn your hair dryer to the highest heat setting. Hold it a few inches away from the patch and move it back and forth to ensure the entire patch is evenly heated. - Step 2: Peel the Patch
After 1-2 minutes of heating, use your fingers (or tweezers) to gently peel off the patch. If the patch doesn’t come off easily, keep applying heat for a little while longer.
3. Use a Solvent or Adhesive Remover
If heat alone doesn’t work or if you’re dealing with a particularly stubborn patch, a solvent or adhesive remover can help dissolve the glue. However, be cautious when using these products on fabric, as they may damage delicate materials.
- Step 1: Test on an Inconspicuous Area
Before applying any solvent to the patch area, test it on an inconspicuous part of the fabric to ensure it won’t cause discoloration or damage. - Step 2: Apply the Solvent
Use a cotton ball or cloth to apply the solvent to the edges of the patch. Let it sit for a few minutes to soften the adhesive. - Step 3: Peel the Patch
Once the adhesive has softened, use tweezers or a flat tool to gently peel off the patch. If necessary, use more solvent to remove any remaining glue.
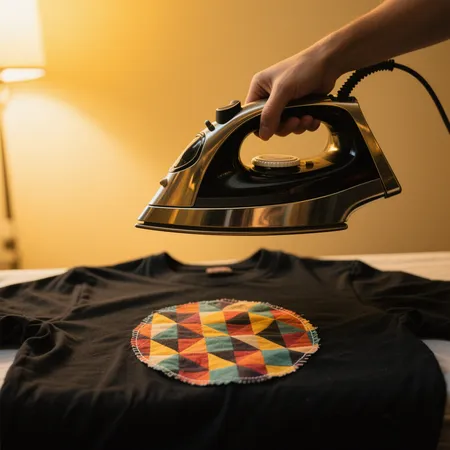
4. Use an Ironing Paper or Tape
In some cases, an easy way to remove an iron-on patch is by using ironing paper or tape. This method can help lift the patch without direct heat, though it works best on newer patches.
- Step 1: Apply Ironing Paper or Tape
Place a piece of ironing paper over the patch and apply the heat of the iron briefly (less than 30 seconds). The adhesive will soften and adhere to the paper or tape. - Step 2: Remove the Patch
Once the patch is lifted, gently peel it off using the paper or tape. Be sure to work slowly and carefully to avoid any damage to the fabric.
What to Do After Removing the Patch
Once you’ve successfully removed the iron-on patch, you might notice some residual adhesive on the fabric. Here are a few tips for cleaning up:
- Use a fabric cleaner to gently scrub the area where the patch was. This will help remove any leftover adhesive without harming the fabric.
- Wash the item to get rid of any traces of glue or heat marks. Use a gentle cycle to ensure that the fabric is protected.
Conclusion: Removing Iron-On Patches Doesn’t Have to Be a Hassle
Now that you know how to remove iron-on patches, you can easily change up your clothing, replace old patches, or fix any mistakes. By using heat, solvents, or even a hair dryer, you can safely remove the patch without damaging your fabric. Remember, patience is key—take your time to avoid causing any tears or burns. Whether you’re upgrading your style or refreshing your wardrobe, the process of removing iron-on patches can be quick and easy with the right approach.