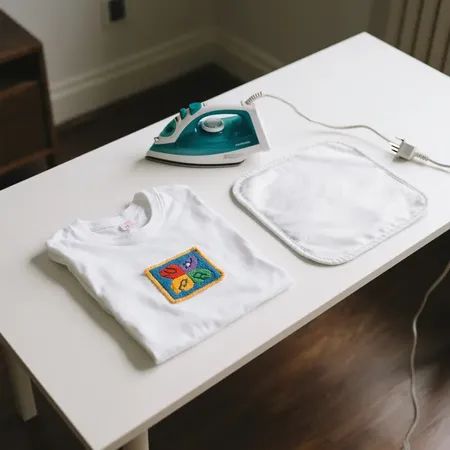
Les patchs brodés sont une façon créative et élégante de personnaliser vêtements, accessoires ou même textiles d'intérieur. Que vous souhaitiez customiser une veste en jean, moderniser un sac cabas en toile ou réparer un trou dans votre jean avec style, les patchs brodés sont la solution idéale. Mais pour les débutants, la vraie question est : comment repasser des patchs brodés correctement?
Ce guide détaille le processus complet de appliquer des patchs brodés à l'aide d'outils ménagers, répond aux questions de dépannage courantes et partage des conseils de pro pour garantir que votre patch reste fermement en place lavage après lavage.

Pourquoi choisir des patchs brodés thermocollants ?
Les écussons brodés thermocollants allient praticité et personnalisation. Contrairement aux écussons à coudre qui nécessitent un travail d'aiguille ou aux patchs adhésifs qui risquent de se décoller, les écussons thermocollants offrent une tenue parfaite après seulement quelques minutes d'application de chaleur. Ils sont très appréciés pour décorer vestes, sacs à dos, casquettes, jeans et uniformes.
Principaux avantages des patchs thermocollants :
- Aucune compétence en couture requise
- Application rapide et sans dégâts
- Apparence professionnelle et homogène
- Idéal pour les projets de bricolage et l'expression créative
Ce dont vous aurez besoin
Avant de vous lancer dans l’application, rassemblez les éléments suivants :
- Ton embroidered patch
- Le vêtement ou le tissu sur lequel vous l'attachez (de préférence en coton ou en denim)
- Un fer à repasser (sans vapeur)
- Un chiffon fin ou une serviette
- Une surface de repassage dure et résistante à la chaleur (comme une planche à repasser ou une table en bois)

Comment repasser des patchs brodés : étape par étape
Suivez ces instructions pour appliquer le patch thermocollant soigneusement pour de meilleurs résultats :
Étape 1 : Préparez votre tissu
Assurez-vous que la zone où vous allez placer le patch est propre, sèche et sans plis. Posez l'article sur une surface dure et lissez-le. Évitez les surfaces molles comme les lits ou les canapés, qui peuvent absorber la chaleur de manière inégale.
Étape 2 : Positionner le patch
Placez l'écusson brodé, côté adhésif vers le bas (côté brillant contre le tissu), à l'endroit souhaité. Vérifiez bien son positionnement, car une fois collé, son retrait risque d'endommager le tissu.
Étape 3 : Couvrir avec un tissu
Posez un chiffon fin ou une serviette sur la pièce pour la protéger ainsi que le fer. Cette barrière empêche la pièce de brûler sous l'effet de la chaleur directe.
Étape 4 : Appliquer de la chaleur
Réglez votre fer sur la position « coton » ou sur une température élevée sans vapeur. Appuyez fermement le fer sur la zone recouverte de tissu pendant 30 à 45 secondesÉvitez de déplacer le fer : une pression constante est essentielle.
Étape 5 : Retournez et répétez
Retournez le vêtement et appuyez à nouveau le fer sur l'envers du tissu, juste sous l'écusson, pendant 30 secondes. Cela permettra à l'adhésif de mieux adhérer.
Étape 6 : Laissez refroidir
Laissez le patch et le tissu refroidir complètement (environ 5 à 10 minutes) avant de les déplacer ou de les porter. Cela permet à l'adhésif de prendre complètement.

Conseils supplémentaires pour des résultats durables
- Laver délicatement:Laver à la main ou utiliser un cycle délicat en machine à l'eau froide pour préserver la tenue du patch.
- Évitez les sèche-linge à haute température:Le séchage à l'air libre est préférable pour éviter que le patch ne se décolle.
- Point de sécurité:Si vous souhaitez une durabilité supplémentaire, en particulier sur des articles comme des sacs ou des vestes, ajoutez quelques points à la main sur les bords après le repassage.
Erreurs courantes à éviter
- Utilisation de la vapeur : Désactivez toujours le mode vapeur. L'humidité peut fragiliser l'adhésif.
- Repassage sur tissus délicats : Le nylon, la soie ou les matériaux extensibles peuvent fondre ou ne pas bien retenir les patchs.
- Sauter le verso : Le repassage à l'avant et à l'arrière permet au patch d'adhérer parfaitement.
- Choisir le mauvais emplacement : Évitez les zones avec des coutures ou des surfaces inégales qui empêchent un contact complet.

Quand les patchs thermocollants ne fonctionnent pas
Certaines situations nécessitent une alternative à l’application de chaleur :
- Pour les tissus synthétiques, utilisez plutôt des patchs à coudre ou de la colle pour tissu.
- Pour les équipements de sport ou les articles de plein air, pensez aux patchs à dos velcro ou à coudre pour une fixation plus solide.
Réflexions finales
Apprentissage comment repasser des patchs brodés est une compétence précieuse pour quiconque aime la mode DIY ou souhaite personnaliser ses vêtements. En suivant les conseils instructions pour appliquer le patch thermocollant et en préparant correctement votre matériel, vous pouvez appliquer des patchs comme un pro en quelques minutes.
Que vous souhaitiez couvrir une déchirure, ajouter du style à vos vêtements ou mettre en valeur votre style, les patchs brodés sont un accessoire intemporel - et maintenant, vous savez exactement comment les appliquer.


